
1988 Jeep Cherokee XJ4.0L Renix + AW4 + NP242
After upgrading the brake booster in my ‘88, 2 door Cherokee to a dual diaphragm booster, I could not get my brake light switch to operate reliably. Anyone familiar with this swap knows that depending on the booster, you have to grind a portion of the booster rod to fit the factory brake light switch (I used a booster from a WJ). After spending about half a day (in a less than desirable position under the dash) trying to shim and adjust the switch, I gave up and looked for another solution that did not require using the factory brake light switch. After some quick research it seemed this was a common problem. I discovered that my jeep had another switch higher up on the brake pedal assembly that I believe is used to unlock the torque converter (I am not sure if a manual transmission XJ would have this sensor. The hole may be there from the factory in which case you could add this sensor). I decided to tie into the output from this switch and use it as a brake light switch in addition to its current use.
Materials:
⦁ 2x SPDT Bosch style relay – Can be bought at any auto parts store or any store that sells car stereos such as Best Buy or Fry’s Electronics. The part # you will be looking for at Best Buy is a Directed Electronics 8617. The part number you will be looking for at Fry’s is InstallBay IBR30. Just make sure whatever relay you purchase is a single pole double throw style, this is crucial as a single pole single throw style will not work. The two part #s listed above also come with a detachable pigtail which makes wiring much easier.
⦁ Soldering equipment/butt connectors/crimp caps/etc. – Basically anything you are comfortable using to wire up the relay. Do yourself a favor and avoid using wire nuts. Wire nuts were not intended for any environment where vibration may be present.
⦁ Wire stripper/cutters
⦁ 13mm socket
Procedure:
⦁ Do yourself a favor and start by using the 13mm socket to remove the front driver’s seat. It is only 4 bolts and your body will thank you.
⦁ Locate your wires. Your factory brake switch has 1-2 red wires going into to (12v+) and 1-2 wires on the other side of the switch (output). The torque converter switch has 1 black wire going into it (negative ground, not used) and one wire coming out of it. See the next 2 pictures below.

Factory brake light switch: (my XJ had two plugs on this switch, I believe one was to turn off the factory cruise control when the brakes were applied. I tied both of reds together and the two blues together as this is how the factory switch operated). All XJ’s should have the 12v+ input as a red wire. The wire color on the output of the switch may vary.

Factory torque converter switch: This switch may not be equipped on XJ’s that left the factory with a manual transmission. However, the bracket may still be there which means you could pick up a switch from an automatic XJ, (Not 100% positive on that. May need to crawl under your dash for that.) All XJ’s should have a black negative ground input wire. The color on the output side of the switch may vary (mine was light blue with a yellow stripe).
⦁ Cut off the factory brake light switch plug (1st picture) and wire two relays as outlined below (may want to disconnect the battery before this step as the red wires are constant 12v+).
⦁ Cut torque converter switch output wire (the NOT black wire) after the switch and before the TCM (2nd picture) and wire as outlined below.
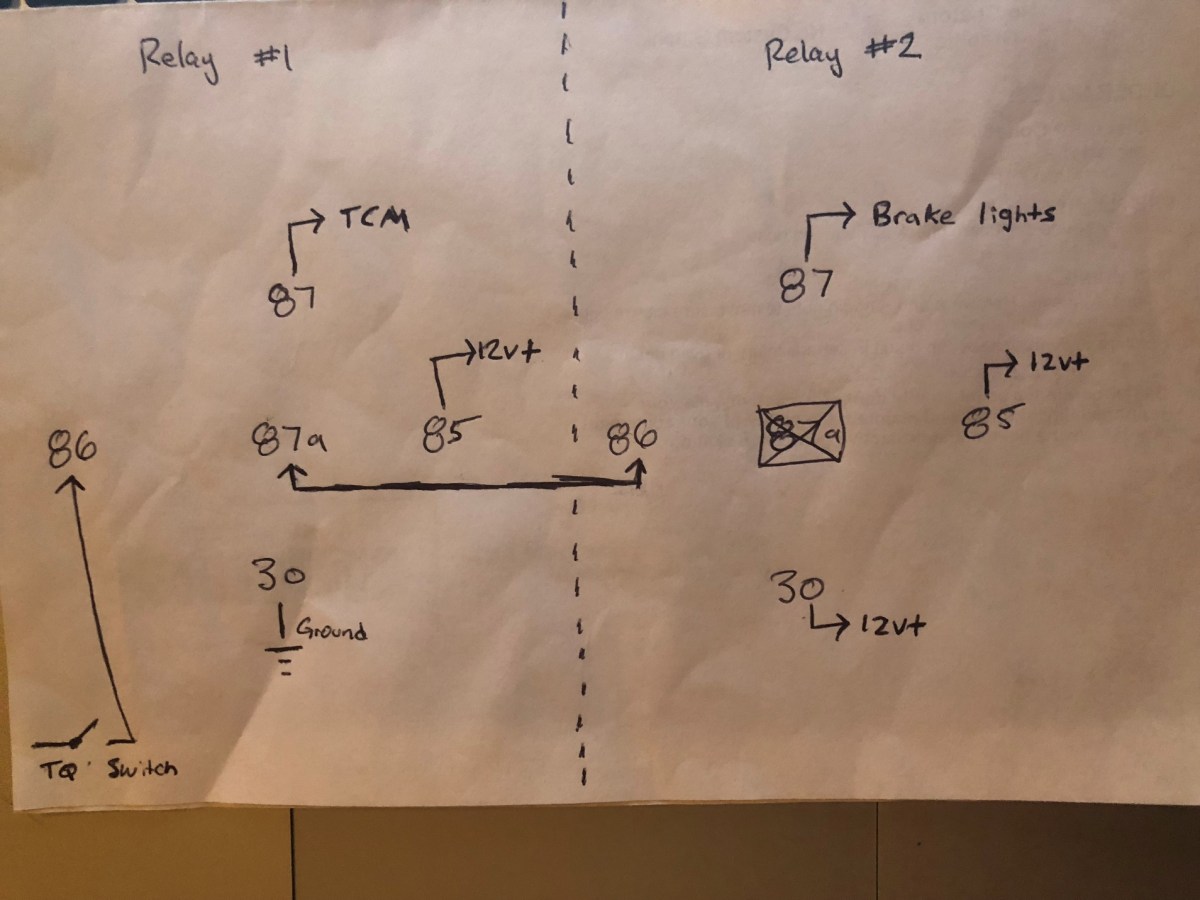
Relay Terminal Wiring:
To keep it simple I will use relay and relay 2.
Relay 1:
87a – Connect to 86 of relay 2
85 – 12 volt + (red at brake light switch)
30 – Ground (will need to make your own ground, make sure to remove any paint and ground to bare metal)
86 – Switch side of factory torque converter switch (the wire that was cut in step 4, the end which leads directly to the switch)
87 – TCM side of factory torque converter switch (the wire that was cut in step 4, this end will lead to the passenger side of the dash and ultimately terminate at the TCM)
Relay 2:
87a – not used
85 – 12 volt + (red at brake light switch)
30 – 12 volt + (red at brake light switch)
86 – connect to 87a of relay 1
87 – Connect to brake light power feed (blue with a black stripe in the 1st picture. Your color may vary. It will basically be the wire that is NOT red on your brake light switch)
Here is a simple diagram that may help:
Here’s the basic of what the relays are accomplishing:
The factory torque converter switch sends a ground signal to the TCM when the brake pedal is NOT engaged. When the brake pedal is pressed, the TCM loses this ground signal and the torque converter unlocks to avoid damage when stopped. Relay #1 replicates this process while also sending a ground signal to activate relay #2 which sends 12v+ to the brake lights, similar to the factory brake light switch.
Two thing to note:
Relay #1 is drawing 150ma when the brake switch is not activated. Therefore, if you plan to park you Jeep for an extended period of time, you should disconnect your battery or plug into a battery tender.
You can adjust the torque converter switch by pushing it closer to the brake pedal if you needed and vice versa (much easier to adjust than the factory brake light switch). When you press on the brake pedal you should hear the relay click, and the brake lights should come on.
5. Now drink a beer.
